John C. Doornkamp
PHOTOGRAPHY BLOG

PHOTOGRAPHY BLOG

Read from the bottom upwards to see the full sequence of blog posts.

NEW WEB SITE THAT HELPS YOU TO CREATE YOUR OWN WEB GALLERY

When I was a young new photographer I relished the idea of having my own photographs featured in a gallery on the internet.


If I had found the information available on this new web site I would have enjoyed that wish long ago.

You need not wait as long as I did. Just go to: Creating My Photo Website

BLOG TO ACCOMPANY NEW WEB SITE

The new web site designed to help newcomers to photography

https://allphotography.info


is accompanied by a new blog.

It appears three times each week.


One of the included featurs is called:


 Photographers worth following

The list so far includes:

William Neill (27th dec. 2023)

Chris Upton (10th Jan. 2024)

Ross Hoddinott (19th Jan. 2024)

David Gray (2nd Feb. 2024)

Mike Wardynski (23rd Feb. 2024)


See for yourself:


https://wordpress.com/view/doornkamp.blog

NEW WEB SITE 

FOR STARTERS IN PHOTOGRAPHY

Starting out in photography can be very confusing.

I've tried to take away some of the confusion with a new web site which is ambitiously called:


https://allphotography.info


Give it a try if you need a helping hand. Let me know how you get on.

AVAILABLE AS eBOOK AND AS PAPERBACK

'Photography' book cover

Most of the photographers that I know are completely immersed in their own photography and that of their peers. That is their world and they are lost in it. They seldom look back at the time when they first began their life in photography.


That was me until my grandson started to ask me some basic questions about photography. It made me think again about those hurdles to progress that the new photographer has to face.


The result is this new book designed specifically for the beginner, and aiming to lead them quickly and easily into creating images of which they can be proud. Soon they will become 'one of us'. More than that, they are the future of photography and they too can share in the fulfilment that photography can bring.


Why not pass this on as a present to someone who is just starting out?

'Photographing Water' book cover

WHAT PEOPLE SAID ABOUT THE FIRST TWO EDITIONS:


"I strongly recommend "Photographing Water" not only to anyone who wants to photograph water, .... because much of what the book teaches is extendable to other subjects." (Amazon customer)


"The book is very easy and pleasant to read" (Luisa)


"An unbelievably fascinating book about water ... The author's insight coupled with his detailed explanations and reasoning made this book a valuable gem that has a place on any photographer's bookshelf." (Walt)


"Good 'learning by example' book ... Good examples with a concise discussion of how to achieve similar results." (Bill)


"Very good indeed. Simple and objective." (Amazon customer)


Photographing water well takes experience and lots of practice.


This book offers a short-cut with suggestions and advice on effective techniques.


The examples include images of running and falling water, snow, ice, clouds, mist and fog, dew, and steam


A special feature of this book are the explanations of the forces of nature that are at work in each case.


This scientific understanding of the role of water in the landscape is a great aid to knowing how to photograph them with meaning as well as with an artistic flair.

WHAT IS WRONG WITH USING  PRESETS ?

One of the big appeals (and selling points) of image processing software is the availability of presets .

I have used, and valued these in my own work. So what is wrong with using them?


They make us all the same. 


They create  a common look amongst our images, and reduce the subtle differences between our styles of photographic art.

PHOTOGRAPHING WATER -3rd EDITION

Fully Revised and Expanded with around 200 photographs

NOW AVAILABLE ON KINDLE BOOKS

WHICH PHOTOGRAPHERS DO  YOU FOLLOW?

Original ideas are hard to come by.  So, what do we do?  We look to other photographers for inspiration.

As a landscape photographer I have always admired and tried to emulate the work of Ansel Adams. Closer to home, and in my earlier days, I have admired and learned from local photographers such as Les Yallup.

Now, two photographers stand out to me, both of whom I have followed for years. One is in the USA and the other in the UK

I have always been in awe of the creative work of William Neill. True, he has the wonderful landscapes of Yosemite all around him. What makes him special in my eyes is the way in which he captures the stunning beauty that is the essence of this landscape.

In the UK my inspiration comes from the creative work of Chris Upton. Chris has not only inspired me, he has also become and inspiration to others through his workshops and lectures.

None of us live in isolation. We are surrounded by other photographers who can stimulate us to do better.

I am not saying that we should simply copy the work that they do. Far from it. However their example can set us off on a creative journey of our own.

Then, just may be, we can become an inspiration to someone else.


SELLING TO STOCK LIBRARIES

During a recent trip to Switzerland I allowed time for creating images that could be sent to a stock library.

It was during this trip that I realised that my mind-set changed when I moved from taking photographs for my own needs to taking photographs for stock libraries.

This manifested itself in two important ways:

      1. The subjects had to be suitable for stock library needs.

      2. Every image had to fit the format and quality guidelines set by the stock library.

This may seem obvious, and it is, but so often I meet photographers who believe that the stock library is bound to be won over by their whimsical and quirky (and often unappealing) photographs.

If you want to succeed with stock libraries you need to stay inside their rules, and just be better at it than everyone else.

THE FIRST ADVICE THAT I WAS GIVEN

When I joined the Nottingham and Notts. Photographic Society I was very new to "real" photography. I devoured every piece of technical advice that I was given.

This was a wonderful community of photographers that made me alive to what photography could be.

Amongst the members was a superb photographer by the name of LesYallop. I learnt a great deal from him.

To this day, some 30 or more years later, I can remember his first piece of advice. "John," he said "set your camera on aperture priority and take control of depth of focus on every shot".

What a difference that advice made!

It is such a temptation to set everything on auto and trust that the camera will get it right. Full Auto will produce a well exposed picture, but it will not create the photograph that you really want. Doing that relies on your skill in controlling the depth of field.

If doing so makes your shutter  speed struggle, then ramp up the ISO, with modern sensors hardly anyone will notice.

However, they will notice if the depth of focus is less than optimum.

I'VE BEEN BLOWN AWAY

A web site like this demands that you do a great deal of research into all aspects of photography. In particular there is a need to keep up with new developments.


However, in order to remain sane you have to be selective as to what you can cover.


It is also necessary to divide your time between hardware and software, and it is the software side of our world that has caught my eye recently. New image processing software is being paraded in front of us all of the time. The current batch is dominated by the introduction of AI (Artificial Intelligence) techniques to improve our images.


Not all AI based software is created the same. Nor have I had the opportunity to use every one of the new offerings. They are all quite probably a great advance on the past.


One of this new generation is the software that is produced under the Skylum banner and it is called Luminar Neo.


I have been experimenting with this software and have been really impressed by the quality improvements that it generates, and both the ease and speed with which this is achieved. I rarely react with this level of enthusiasm, but this one is proving to be special.


I have no doubt that there will be further enhancements to its current abilities. For now I am happy to go on this journey with the development team.


This software can be used either as an add-on to your existing processing tools or as a stand-alone package. I use it in combination with ON1 Photo RAW software.


Support is also available from the developers:


One means of support is through Luminar X Membership.

Luminar X Membership is a one-year subscription to a collection of exclusive Presets, Skies, Tutorials, Courses, and more. With the subscription, users will get:
• 10 exclusive new Luminar Looks every month
• 120 high-resolution Skies or Textures created by pro photographers
• 15% discount on all items in the Luminar Marketplace
• 4 exclusive photography tutorials every year
• 4 exclusive photography tutorials on editing every year
• An exclusive community for Luminar X Members
• Personal offers and exclusive gifts


If you do one thing today do yourself a favour and check out Luminar NEO .
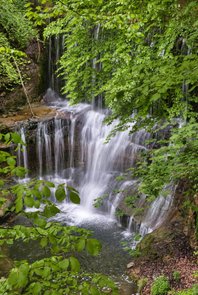
Waterfall Kusnachte Tobler, Zurich

A recent photograph edited through LuminarNEO.

Zurich Tobel at Kusnacht, Switzerland

STILLS  OR  VIDEO?

Photographers are discovering the ability of their cameras to record video  - and not just for their blogs or YouTube channels.


It is not really a competition between being a stills photographer and becoming a video photographer. Each has its own place depending on the purpose.


I was drawn into video by the need to record the singing of a male voice choir.


There has been a great deal for me to learn not just about the art of recording, but especially about video editing.


Modern cameras are well equiped to record video as well as stills. At least you wont have to change your camera.


BUILDING A NEW FUTURE OUT OF THE PAST

Let’s face it. We are in the 21st Century. Many of today’s photographers never knew a darkroom, wet development processes, the tactile nature of film, or the tangible joy at holding a newly printed image as it came out of the fixer.


Today the technology available to us has transformed the way most of us work in order to create our black and white images. Digital camera to computer and through software to a black and white image is the normal route that we take.


Sometimes we get the feeling that digital image processing is trying to imitate the ways of the past.

So, why should we be constrained by the ideas that came with darkroom wet processing?


The truth is that no such constraints exist. Where the film worker saw value in good composition, the benefits of having a well-exposed image, and the desirability of expressing a subject using a wide range of grey tones, he/she saw what makes a good black and white image.

A few of us are at the age (myself included) where we can still remember the processes (and smells) of the darkroom whilst being young enough to have grown with the digital age.


It is not so much that we have a foot in both camps, but that we can bring into the new the best of the values of the old. Furthermore, the techniques of today enable us to go well beyond what was previously possible in the darkroom.


This is the theme of my eBook:


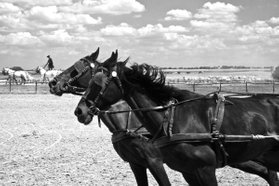
Galloping black horses

Only £2.99 (or $2.99) each.

BLACK AND WHITE PHOTOGRAPHY


From your colour photograph to a great black and white

image.

-

Sample what the software will allow you to do.

-

Emulate the styles of the darkroom photographer

-

All the essentials are here in a direct

bullet point style - with many examples to stimulate your own photography.

This is not so much an instructional book but rather it is an instructive book. Although the use of some digital techniques is fully explained, I want to draw on those elements of film photography that helped to create a good, strong, and appealing black and white image.


There is no point in re-inventing the wheel. However, there is every point in bringing the design of the wheel into its present-day use. Read the book and think about it.

CLICK ON THE "BUY NOW" BUTTON AND DOWNLOAD YOUR COPY 

THE ZONE SYSTEM AND MODERN PHOTOGRAPHY

Although Ansel Adams did work in colour he is best known for his stunning black and white images. Many of these he printed himself using wet processing darkroom techniques. 


Ansel Adams was always keen to capture a wide range of grey tones within his images. Nothing has changed, for in most cases it still pays to record and display a wide range of grey tones if you want a good B&W result. 

In order to help him to achieve this during the exposure of his film Ansel Adams (together with Fred Archer) formulated The Zone System.


Each of the 11 bands within this Zone System ranged from pure white (Zone X) to full black (Zone 0) mimics the full range of tones that could be achieved in one negative. 


Tones of the Zone System

Before taking a picture a judgement is made as to which part of the subject is to be represented by Zone V. An exposure reading is then taken from this subject and the film exposed accordingly. This technique ensured that the middle grey tones were captured "correctly" and the tones on either side would then fall into place. 


(I hope the purists will forgive me for this simplified description of the Zone System!)


The range of tones coupled with a decision on how the image was to look in its final form determined the way in which the negative was then processed. Likewise, when the final print was created great care was used to keep tones within their zones, thereby keeping the print true to the original vision when the negative was exposed.


Our aim in digital image processing is to replicate this kind of approach to photography whereby our images capture the full range of tones within the subject - unless we have a specific reason not to do so.

Modern digital cameras include very precise exposure meters, most of these allow spot readings to be taken, and by selecting a mid-tone for a spot reading we are doing what the full use of the Zone System requires (in terms of image exposure).

Today we can check for a full range of tones by examining the screen view of the exposure histogram. If the exposure does not show a spread across the histogram then the exposure settings on the camera can be adjusted and a second image taken.


Histogram above the tones of the Zoner System

In the above diagram I have superimposed an in-camera histogram on to the zone system diagram (note that this diagram has been 'flipped' to place zero on the left rather than the right - as it is in the top diagram). Clearly the exposure that the histogram describes is a very dark image and does not contain a good wide tonal range. Adams would probably have been very unhappy about this. Indeed so was I , and the processing software was used to extend the tonal range before the image was printed.


This is not far removed from the methods used in the wet system used by Adams. The Zone System was also used during image development in order to judge when a B&W negative contained the best range of grey tones to allow a fine print to be made. The modern equivalent is the adjustments we can make to the histogram when using the Levels adjustment. 


It is at this stage that the digital photographer decides on how to spread the tonal values. The link with the Zone System of classic B&W photography still exists, it is just that we tend not to realise the connection. 

Nevertheless, the Zone System challenges us to adopt a way of thinking when it comes to looking at the grey tones during image capture as well as when we are processing the image. 

PHOTOGRAPHY IS NOT A RANDOM PROCESS

It is clear that the photography practiced by Adams was far from being a random process.

In fact it had a distinct rubric from which we can all learn.


Adam's approach has been described as one of thinking backwards. In a nutshell it involved starting with having in mind the character of the final presentation of the image. In other words, if you do not know where you are going you wont know how to get there.


Once the objective was clear the sequence of actions became:

1.   Know the final picture proportions

2.  Understand the amount of enlargement to be undertaken

3.  If the final output is in the form of a print, know the contrast characteristics of the paper medium 

4.  Know in advance how the production of the final image is related to the exposure required at the taking stage

5.   Study the lighting conditions

6.   Think about the compositional aspects of the image

7.   Check the camera settings (in todays terms these include the ISO number) that will influence the character of the final image

8.   Think about the required lens-stop (and its influence on depth of focus as well as on exposure).


Although Adams worked with film and darkroom processing on to a final paper medium, the necessary stages in thinking about the exposure is not so different from those that we require to use today with our digital cameras.


'Random in' results in 'random out'.


Production of fine photographs is a controlled and not a random process.

     ANSEL ADAMS

The Decisive Moment

For Cartier Bresson(a famous French photographer with whom this expression is most closely associated) the 'decisive moment' related to the timing of the shutter release. For Adams it related to the decision to become a full-time photographer rather than a concert pianist.

Adams was convinced that photography should allow the expression of creativity by the artist. What frustrated him was that the photographic process, and in particular the papers that he had been using, did not allow him to give true and full expression to the creativity that he wanted them to display.

Parallels exist today. We hear the argument that it is the photographer and not the equipment that creates the photographic image. Whilst that is true, it is equally the case that full artistic expression can be stunted by the limitations of the equipment being used.

So it was in the case of Adams. He came to realise that he was being held back by the use of textured photographic papers. However, when he changed to using smooth, glossy-surfaced papers he found that they revealed every detail in his negatives, with a "greater feeling of light and range of tones".

Adams felt that at last the gift of visualisation that he possessed, and existed in his negatives, could be transferred to his photographic prints.

In his own words it was through this discovery that he "felt liberated".

This became his decisive moment when photography held a greater pull on him than music.

Today we have a far greater range of equipment from which to choose. Even after the fundamental choices of cameras and lenses there remains filters, drones, software, as well as the issue that Adams had over the choice of paper for conveing to others the results of his visualisation.

     ANSEL ADAMS

     The early years

Now that we know that Adams became a renowned photographer it is interesting and informative to discover how this came about. There are lessons in this for all of us.

Ansel Adams' early years are recounted in his autobiography where he describes his introduction to the darkroom. He got a job as a laboratory assistant and general delivery boy in a small processing business. He remained deeply devoted to his music (training as a concert pianist) with hiking and photography as his main diversions.

Adams describes himself as an ardent hobbyist, as so many of us do (did), but his musical training had taught him that practice makes perfect. He admits that the route to mastering photography, and more importantly the acquisition of his own style and intuitive feel for creative photography came gradually, and over a period of many years.

The lesson for us is that there is nothing that replaces patience and years of experience.

No one becomes an instantly creative and fully able photographer, not even with a digital camera.

Finally, to paraphrase Adams: 'If I do not "see" an image in terms of its creative potential I do not feel obliged to press the shutter.

I am sure you get the point. It is the only mantra that keeps us from accumulating hundreds (if not thousands) of eventually redundant images.


ANSEL ADAMS 

How it began

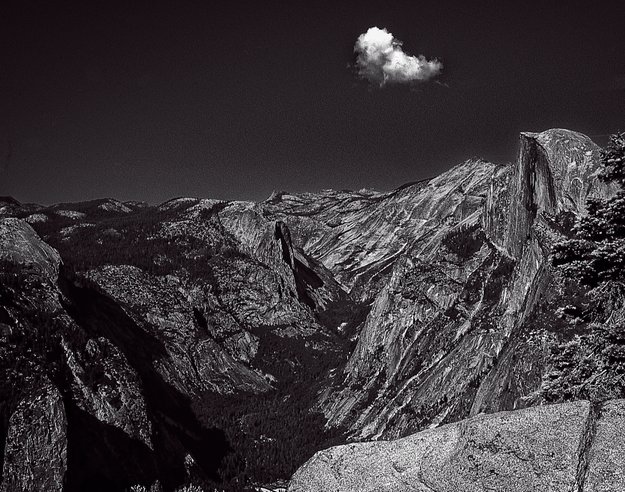
We associate Ansel Adams with Yosemite National Park, California, and especially with his photographs of the now famous features such as Half Dome - seen here on the middle right in one of my images (taken on a 'pilgrimage' to Ansel Adams country).

Haf Dome above Yosemite

Adams was brought up in San Francisco and had a childhood frequently punctuated by bouts of illness. During one such period, when he was 14 years old, an aunt gave him a copy of "In the Heart of the Sierras" (J.M.Hutchings, 1886) which he devoured with enthusiasm and his love for Yosemite was born. This was in the April of 1916, by June his arm twisting and persuasion had worked and the whole family were on their way to Yosemite for their vacation.

He was totally hooked by what he saw.

A few days into that holiday his parents gave him a Kodak Box Brownie and before a week had passed he had climbed to a viewpoint that allowed him a clear sight of Half Dome, only to fall and in doing so pushed the shutter. He finished up with one of his earliest, if upside down, images.

A long period of living in Yosemite began in April 1920 when Adams was appointed as its custodian on behalf of the California State Park Commission.

Thus began a life-time of getting to know his subject intimately, and he came to know exactly where and when to go for the creation of his remarkable images.

As Adams himself confessed - "I knew my destiny when I first experienced Yosemite". (Ansel Adams An Autobiography, 1985).

Great photographers have something running deep inside them. Although we may be able to recognise it when we see it, very few of us actually have it.


ANSEL ADAMS 

Ansel Adams was the father of modern day monochrome landscape photography.


It is true that he worked with completely different equipment. He predominantly used large plate cameras, his medium was film, and his expertise in the dark room was as admired as his techniques in the field.


I believe it is relevant to note that he was a gifted concert pianist, and there are signs that he carried his ability in music into his photography. He perceived a negative as he would a musical score and the final print as the performance that he drew out of that negative.


When I look at Ansel Adams work as featured in "Examples: The Making of 40 Photographs" (Published by Little, Brown and Company,1983) there are some stark differences to the photographs contained in "Camera Work" (see below).


Adams' photographs are black and white - and I mean that literally. They carry (in most cases) the full range of tones from full black to pure white, unlike the more mushy brown tint of earlier imagery.


Secondly, Adams was a fanatic about his photographs being sharp. Whilst he did produce some soft focus images

(such as 'Lodgepole Pines - Lyell Fork of the of the Merced River, Yosemite National Park) in the vast majority he was concerned to make them sharp. This was a distinct difference from the images of earlier years.


Lastly, for now, Adams was co-author of the Zone System by which exposure was judged. By using this system he was able to calculate exposure from the luminosity of the features within the field of view. These measurements enabled him to decide not only on exposure but also on the filters that he should place over the lens.


In the next few blogs I shall be looking at the views and ideas expressed by Adams not only in relation to black and white photography but also about photography in general.

We can learn much by listening to the distant voice of a talented and much respected photographer.


A BRIEF AND SELECTIVE LOOK AT THE BEGINNINGS OF BLACK AND WHITE PHOTOGRAPHY

In brief: black and white photography was, for decades, the only kind of photography.

It was the domain of the wealthy and the inventive. It gained a following from studio photographers who saw a business opportunity in making portraits for middle-class families.


In the late 1800s there was a rebellion against what we would now call documentary photography and against commercially driven formal portrait photography.


This rebellion was driven by those photographers who saw the potential of photography as a means of free artistic expression.

They wanted to create a new art form with photography at its heart.


If you want a good read about photographers during this period try: "Camera Work - The Complete Illustrations 1903-1917" attributed to Alfred Steiglitz and published by Taschen in 1997. (A search on the internet also reveals copies by Dover Publications (1978) with prices ranging from £8 - £15.)

Even in those early days there were debates about photo manipulation. One of the driving forces for image processing in which the photographer intervened between pressing the shutter and making final print was the desire for experimentation.


This was an age of technical discovery and inventiveness. 

For example, a photograph might be given a sepia (or some other) tone, areas would be shaded in or objects removed if they offended the composition.


We are now able to immitate those experimental techniques by digital methods. The real question then as it is now is "do such tinkerings create a more artistic rendering of the subject?".


It is clear from reading some of the articles written at this time that black and white photography was not a poor relation of painting, it was a new medium for artistic expression. It was able to create images (pictures if you like) that were distinctly photographic and not 'pretend' imitations of painting.

Out of this early movement there came a spirit of free and highly creative thinking. The discussions were more likely to be about artistry in photography than about the latest gismo.


For me the connection with this era is Ansel Adams, arguably the world's best black and white landscape photogapher. He was active a couple of decades after this early period, but his thinking and approach to photography was built on the ideas that had been developed during this time.


In the blog features that follow this one I shall be looking more deeply into the work of Ansel Adams and the ideas that he left in print.


I am sure that you will find them stimulating perhaps even provocative. However, many of his observations about photography are as pertinent today as they were in his life-time(1902-1984).
ALONGSIDE STILLS PHOTOGRAPHY

One of the greatest joys in my photography has been the honour to serve as photographer for the Dore Male Voice Choir.


The choir is based in the suburbs of Sheffield (where I live) and is made up of 80 or so men whose enthusiasm for their music and comradeship is to be admired.


Initially I was charged with taking stills of the choir at its various venues and concerts. However, it quickly became apparent that there was also an opportunity for video recording. The problem was that I had never done any video work. It was a case of learning quickly on the job.


The choir now has about four years of video record both for the archives and also for any member to own or share.


You might like to listen to one of my favourites which is taken from a longer recording. I released it for public viewing (and listening) soon after lock-down began, under the title "Dore Male Voice Choir Calms the Nation".


Here it is:

TRYING SOMETHING NEW

Having started my photographic life with black and white images and then following the masses into colour it has been fascinating to see that so many photographers are adopting black and white as their medium of expression. 


I  have just put down the current issue of a magazine called "Black and White Photography" which carries the sub-title "Cool, Creative and Contemporary".


The last word in this descriptive trio makes me smile for while the style of imagery that the magazine contains may appear to be modern, there is so much about it that was already with us before the era of colour for the masses.


What I find even more intriguing is that my Fuji T-4 camera has black and white settings that not only include mimics of old films but also some of the filters that were used over the lens to enhance such things as the contrast in the picture.


I am not decrying this, I quite like it. In fact I have set myself the challenge of only taking black and white images for the next three months. Added to this I have acquired a manual Samying 12mm wide-angle lens and it is the intention to make this the only lens that I shall use in this same 3-month period.


So, I am trying something new in the firm belief that something good will come out of it. Achieving this relies on my ability to recognise those situations where this is the perfect combination of medium (i.e. black and white) and lens focal length.


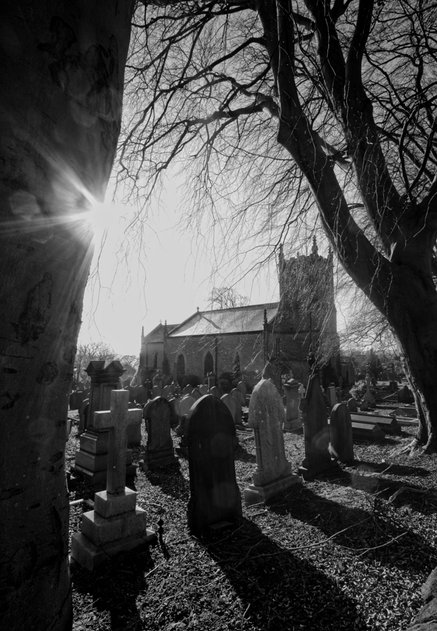
Only time will tell, but in the meantime you might like to see one of the results so far:


Church in cemetery, Dore, England

This is the church in the centre of our village. It makes for a very traditional and very English village scene.